
Desserts
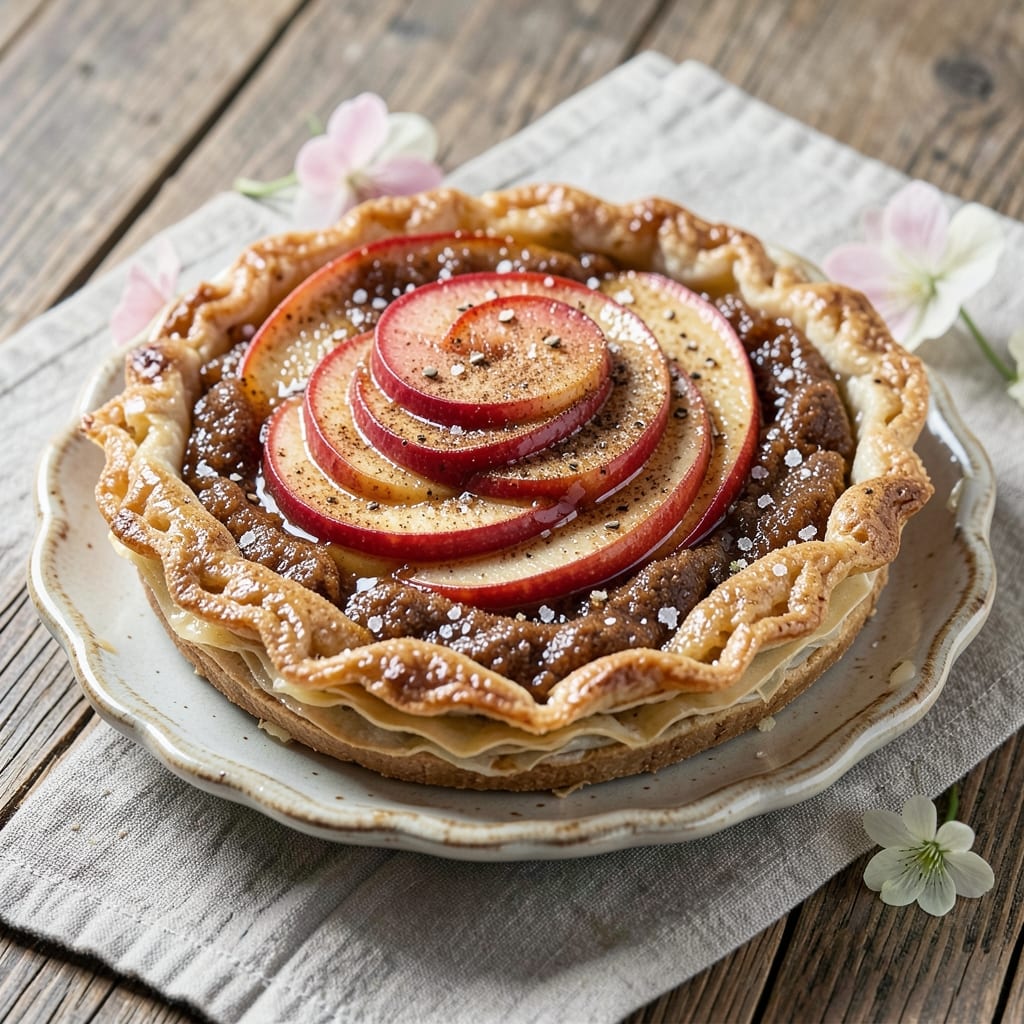
This apple blossom tart recipe transforms delicate filo dough into a showstopping dessert that tastes like spring in every bite. The secret lies in alternating layers of crispy, buttery filo with tender spiced apples, all crowned with a bright lemon glaze that shimmers like morning dew. I developed this version after years of perfecting the balance between delicate crust and rich filling—no one will guess it's beginner-friendly.
The real magic happens in the assembly: thinly sliced apples tossed with cinnamon and cardamom, layered between sheets of filo that bake into a golden, shatteringly crisp lattice. Traditional recipes call for hours of chilling, but this version uses a foolproof cold butter technique that keeps the crust tender while still achieving that signature crunch. The lemon glaze isn't just decoration—it cuts through the sweetness with a zesty brightness that makes every slice taste fresh.
What you'll end up with is a tart that looks like it belongs in a Parisian pâtisserie but comes together in your home kitchen. The apples stay perfectly tender, the filo layers crisp up beautifully, and that lemon glaze transforms an ordinary dessert into something restaurant-worthy. Best of all, it's stable enough to transport—ideal for brunch gatherings or special occasions when you want to impress without stress.
For an extra touch, garnish with edible blossoms (like violets or pansies) for that classic apple blossom presentation, or keep it simple with a dusting of powdered sugar. The filling can be made ahead and baked fresh, making this the perfect dessert for when guests arrive. Let's get started on creating your own masterpiece.
Ingredients for apple blossom tart
Perfectly balanced ingredients for a tart that looks like spring and tastes even better.
| Ingredient | Amount | Notes |
|---|---|---|
| Filo Dough Sheets 🥧 | 12 sheets | Store-bought or homemade, thawed |
| Unsalted Butter 🧈 | 1 cup | Cold, cubed for layering |
| Apples 🍎 | 4 medium | Honeycrisp or Granny Smith, peeled |
| Granulated Sugar 🍚 | ¾ cup | For filling sweetness |
| Ground Cinnamon 🌿 | 1 ½ tsp | Plus extra for garnish |
| Ground Cardamom 🌿 | ½ tsp | Floral depth essential |
| Lemon Zest 🍋 | 1 tbsp | From 1 large lemon |
| Lemon Juice 🍋 | 2 tbsp | Freshly squeezed |
| Powdered Sugar 🍚 | 1 ½ cups | For lemon glaze |
| Vanilla Extract 🌸 | 1 tsp | Pure alcohol-free preferred |
| Salt 🧂 | ¼ tsp | Fine sea salt |
| Heavy Cream 🥛 | ¼ cup | For glaze richness |
| Edible Flowers 🌸 | ¼ cup | Optional garnish (violets/pansies) |
The filo dough is non-negotiable here—Filomena or Fillo Factory are my go-tos, but any quality brand works. Keep those butter cubes cold (refrigerate them between layers) for that signature crispness. Apples should be firm—Honeycrisp or Granny Smith slice beautifully and hold their shape. If you can't find cardamom, double the cinnamon, but the floral note is what makes this taste like spring. The zest matters too—organic lemons have more flavor, but regular works if you use the full tablespoon. Pro tip: Save the leftover zest for cocktails or salad dressings.
No cardamom? Star anise or a pinch of cloves add warmth, though nothing replaces that floral punch. Running short on apples? Pear slices work too—just reduce the sugar to 0.5 cups. The lemon glaze can be made ahead—it actually tastes better after sitting overnight as the flavors meld. For the glaze, powdered sugar from Bob's Red Mill dissolves smoother than store brands. Want extra shine? Add a splash of milk or cream to thin it out. The edible flowers are optional but worth hunting down at farmers markets—they're delicate enough to add beauty without overpowering the tart.
Assemble the tart up to 24 hours ahead and refrigerate covered. Bake just before serving so the filo stays crisp. The glaze sets quickly, so work fast when drizzling. Store leftovers in an airtight container for 3 days—it reheats beautifully in the oven for 5 minutes at 350°F. For transport, wrap individual slices in parchment and secure with twine. The glaze might melt slightly in warm weather, so keep it chilled until serving. Freezes beautifully for 2 months if you wrap it tightly in plastic wrap and foil.
Why You'll Love This Recipe
- No-Fuss Layers: The filo dough sheets stack like magic—just brush with butter, fold, repeat. No rolling, no stress, and that golden, flaky crust happens every single time. I’ve made this with store-bought apples (yes, even the slightly bruised ones) and still get rave reviews.
- Cinnamon-Kissed Magic: That first bite of warm apple with the cinnamon-sugar crunch? It’s the kind of flavor that makes you pause mid-slice. The butter in the dough melts into the apples, turning them tender without turning to mush—honestly, it’s the perfect balance of sweet and cozy.
- Weeknight or Weekend Star: This tart is my go-to for lazy Sunday mornings and last-minute dinner guests. Slice it up for breakfast with yogurt, serve with ice cream for dessert, or pack individual portions for lunch. (Between us, I’ve even reheated leftovers straight from the fridge—it’s that good.)
- Budget-Friendly Crust: Filo dough and butter might sound fancy, but they stretch farther than you’d think. A single box of filo and a stick of butter make two tarts, and apples are cheaper than most fruit—especially when you use seasonal varieties. Plus, the leftovers? They disappear faster than you can say “second slice.”
Step-by-step instructions for apple blossom tart
Here's how to assemble this delicate tart with crisp filo layers and fragrant floral notes.
Prepare the Apple Filling
Peel and core the 4 medium Apples, then slice them into ¼-inch thick rounds. Toss the apple slices with 0.75 cup Granulated Sugar, 1.5 tsp Ground Cinnamon, and 0.5 tsp Ground Cardamom until evenly coated. This step infuses the apples with warm spices while keeping their shape intact for clean layers later.
Transfer the seasoned apples to a bowl and stir in 1 tbsp Lemon Zest and 2 tbsp Lemon Juice. The citrus brightens the natural sweetness of the apples and prevents browning during assembly. Let the mixture sit for 10 minutes while you prepare the tart base—this gives the flavors time to meld.
Assemble the Filo Layers
Preheat your oven to 350°F and line a 9-inch tart pan with parchment paper, leaving an overhang for easy removal. Brush the bottom of the pan with 2 tablespoons melted Unsalted Butter, then layer 4 sheets of Filo Dough Sheets one at a time, brushing each with 1 tablespoon melted butter between layers. Keep the layers slightly overlapping for strength.
Press the final layer gently against the sides of the pan to create a smooth crust. Here's the thing—filo dough is delicate, so work quickly to prevent it from drying out. Place the assembled tart pan in the preheated oven for 10 minutes to create a sturdy base while you prepare the filling.
Layer Apples and Butter
Remove the tart base from the oven and let it cool slightly. Arrange the apple slices in a circular pattern, slightly overlapping them like flower petals. The edges should come within ½ inch of the tart pan's rim, leaving space for the final layer.
Dot the apples with small cubes of Unsalted Butter, about 12 cubes total, evenly distributed. This butter will melt during baking, creating a luscious sauce that binds the tart together. Sprinkle the remaining 0.5 tsp Ground Cinnamon and 0.25 tsp Salt over the apples for balanced flavor.
Complete the Filo Topping
Cut 8 additional sheets of Filo Dough Sheets into strips about 2 inches wide. Brush each strip with melted Unsalted Butter and arrange them vertically over the apples, pressing lightly to secure. This creates a lattice effect that allows steam to escape while keeping the filling moist. Bake for 40-45 minutes until the apples are tender and the filo is golden brown.
I know it seems like a lot of filo, but trust me—this creates the signature crispy layers that make this tart special. The edges should be golden brown, and you'll see the butter bubbling through the lattice. Let the tart cool in the pan for 20 minutes before removing the parchment.
Prepare the Lemon Glaze
While the tart cools, whisk together 1.5 cups Powdered Sugar, 0.25 cup Heavy Cream, 1 tsp Vanilla Extract, and 1 tbsp Lemon Juice until smooth. The glaze should be thick enough to coat the back of a spoon but still drizzle easily. This is your final touch—adding brightness and a professional finish.
Drizzle the glaze evenly over the cooled tart, letting it drip down the sides. For that special touch, sprinkle 0.25 cup Edible Flowers over the glaze while it's still wet. They'll stick beautifully and add an elegant floral accent. Let the glaze set for 1 hour before slicing—this gives it time to firm up and creates that glossy finish.
Pro Tips For Making Apple Blossom Tart
- BRUSH BUTTER THINLY: Filo dough soaks up butter like a sponge—don’t drown it. Use a pastry brush and melt the butter first, then paint it on lightly between layers. Too much butter makes the layers soggy, and nobody wants a greasy tart crust.
- PEEL APPLES AFTER SLICING: I used to peel first, then slice, and half the time the knife would slip. Instead, slice the apples first—skin on—and peel them afterward with a paring knife. It’s faster, and you’ll waste less fruit. (Yes, even if you’re impatient like me.)
- BAKE UNTIL GOLDEN, NOT BROWN: Watch that oven like a hawk—filo turns from golden to burnt in minutes. Pull the tart out when the edges are crisp and the top is just starting to brown, not when it’s deep brown or black. It’ll finish cooking while cooling, but burnt filo tastes like regret.
- CHILL THE CRUST BEFORE FILLING: Skip the rush and let the bottom crust sit in the fridge for 10 minutes after baking. Cold crust holds its shape better, so the apples won’t sink into it like a sad, soggy mess. (Your future self will thank you.)
Creative variations of this recipe
Spring Floral Twist
Replace the lemon glaze with a lavender-infused syrup for a true spring celebration. Simmer ½ cup water, ½ cup sugar, and 1 tbsp dried culinary lavender for 10 minutes, then strain. Drizzle this over the cooled tart and garnish with edible violets. The floral notes complement the cardamom beautifully, creating a dessert that smells like a meadow. 🌸
Spiced Rum Version
Add 1 tbsp spiced rum (like Captain Morgan Original) to the apple filling while tossing with sugar. The warm spices in the rum enhance the cardamom, while the alcohol adds depth without overpowering. For extra flair, flambé the rum in the oven after baking to create a dramatic presentation. Serve with vanilla ice cream for a boozy twist. ✨
Vegan Filo Option
Swap traditional filo for a vegan puff pastry crust (like Whole Foods 365 brand) and use coconut oil instead of butter. The apples stay tender, and the crust achieves that same golden crispness. For the glaze, replace heavy cream with coconut cream—it thickens beautifully and adds a subtle tropical note that pairs surprisingly well with cardamom. 🌱
Winter Citrus Update
Swap cardamom for orange zest and add ½ tsp ground ginger to the apple filling. Use blood oranges for their natural sweet-tart balance. Replace the lemon glaze with an orange blossom syrup—simmer ¼ cup orange juice, ¼ cup sugar, and 1 tsp orange blossom water for 5 minutes. Garnish with candied orange peel for a festive winter dessert. 🍊
No-Bake Cheesecake Layer
For a modern twist, add a graham cracker crust topped with cream cheese filling before the apple layer. Mix 8 oz cream cheese, ¼ cup sugar, and 1 tsp vanilla until smooth, then spread over the baked tart base. Top with apples and filo as directed. The cheesecake layer adds richness that balances the tart's crispness perfectly. 🧀
Mini Tart Bites
Use 6-inch tart pans to make individual portions—great for parties! Use 3 filo sheets per mini tart, reducing butter to 1 tbsp total. Arrange 4 apple slices per mini tart and bake for 30 minutes. Drizzle with glaze and garnish with mini edible flowers (like borage blossoms). These bite-sized treats are perfect for brunch buffets or holiday appetizers. 🍽️
Nutrition facts
Frequently asked questions
Can I make this tart without filo dough?
For a rustic version, use 1 sheet of puff pastry cut into strips for the lattice. If you want a pie-style crust, try a 9-inch pie crust baked first, then top with apples and filo strips. The key is keeping the structure sturdy enough to hold the filling while allowing steam to escape.
How do I prevent the apples from turning brown before baking?
Toss the sliced apples with 1 tbsp lemon juice immediately after cutting. This acidity slows browning while enhancing flavor. For extra insurance, sprinkle with ½ tsp granulated sugar—the sugar draws out moisture and helps preserve color. Work quickly when assembling the tart to minimize air exposure.
What's the best way to store leftovers?
Keep the tart in an airtight container at room temperature for up to 3 days. For longer storage, refrigerate for 5 days—the glaze may weep slightly but can be reheated gently. To revive crispness, bake at 350°F for 5-10 minutes. Freezing isn't recommended as the filo loses its delicate texture.
Can I substitute cardamom if I don't have any?
Yes! Use ½ tsp ground cinnamon plus ¼ tsp allspice—this combo mimics cardamom's warmth. For floral notes, add ¼ tsp orange blossom water (found in Middle Eastern markets) or a pinch of rose water. Avoid nutmeg—it can overpower the delicate apple flavor.
How do I make this tart gluten-free?
Replace filo with gluten-free puff pastry (like Schär brand) and use a gluten-free crust alternative. For the filling, ensure your sugar and spices are certified gluten-free. The texture will be slightly denser, but the flavor remains identical. Test with a small batch first to adjust baking times—gluten-free dough often needs 5-10 minutes longer in the oven.